Thursday 15 November 2012

Final Project


For our final assignment, Philip and I decided to create an audio interface device for creating and altering minimalist experimental music via real time physical interaction. The device consists of a 4×4 button pad, which is used for creating the base rhythm and then using two IR range finders, the users hands become the control input for the speed and frequency manipulation of the melody.
The audio is generated using a Max/MSP patch that receives SERIAL data from two Arduino boards, one used for handling the button pad, and the second for the dual IR analog values.

Video:

http://vimeo.com/55330421#at=0
Progress Photos & Circuit Diagrams:
Arduino Code:
//Sensor 1
int sensorValue;     // variable to store the value of the sensor
byte serialDataValue;  // variable to convert the value of the sensor in byte format
//Sensor 2
int sensor2Value;     // variable to store the value of the sensor
byte serialData2Value;  // variable to convert the value of the sensor in byte format

void setup() 
{ 
  Serial.begin(9600); 
} 

void loop() 
{ 

  //IR sensor 1
  sensorValue = analogRead(A0);
  Serial.print("A ");
  Serial.println(sensorValue);
  delay(30);    //  let max breathe a little

  //IR sensor 2
  sensor2Value = analogRead(A1);
  Serial.print("B ");
  Serial.println(sensor2Value);
  delay(30);    //  let max breathe a little

}
Arduino Code:
//pin connections
#define ledLatchPin A1
#define ledClockPin A0
#define ledDataPin A2
#define buttonLatchPin 9
#define buttonClockPin 10
#define buttonDataPin A3

//looping variables
byte i;
byte j;
byte k;
byte ledByte;

//storage for led states, 4 bytes
byte ledData[] = {
  0, 0, 0, 0};
//storage for buttons, 4 bytes
byte buttonCurrent[] = {
  0,0,0,0};
byte buttonLast[] = {
  0,0,0,0};
byte buttonEvent[] = {
  0,0,0,0};
byte buttonState[] = {
  0,0,0,0};
//button debounce counter- 16 bytes
byte buttonDebounceCounter[4][4];

void setup() {
  DDRC = 0xF7;//set A0-2 and A4-5 output, A3 input
  DDRB = 0xFF;//digital pins 8-13 output

  Serial.begin(57600);

  cli();//stop interrupts

  //set timer2 interrupt every 128us
  TCCR2A = 0;// set entire TCCR2A register to 0
  TCCR2B = 0;// same for TCCR2B
  TCNT2  = 0;//initialize counter value to 0
  // set compare match register for 7.8khz increments
  OCR2A = 255;// = (16*10^6) / (7812.5*8) - 1 (must be  0 && --buttonDebounceCounter[row][index] == 0) {  // if the the debounce counter has
      // been decremented to 0 (meaning the
      // the button has been up for 
      // kButtonUpDefaultDebounceCount 
      // iterations///

      buttonEvent[row] = 1 << index;    // queue up a button state change event

      if (buttonCurrent[row] & (1 << index)){          // and toggle the buttons debounce state.
        buttonState[row] |= (1 << index);
      }
      else{
        buttonState[row] &= ~(1 << index);
      }
    }
  }
}

void shift(){

  for (i=0;i> 3;
    //latchpin low
    digitalWrite(buttonLatchPin, LOW);

    //Serial.println(buttonCurrent[i]);

    for (k=0;k> 1) & 3;
      byte ledx = (ledByte >> 3) & 3;
      if (ledstate){
        ledData[ledy] |= 8 >> ledx;
      }
      else{
        ledData[ledy] &= ~ (8 >> ledx);
      }
    }//end if serial available
  }//end do
  while (Serial.available() > 8);
}    

void loop() {
  shift();//updates leds and receives data from buttons
}

Week 2:

Storyboard:

We decided to keep the same idea of the sequencing interface which will loop sounds that we created, but there will be another component that you will also interface with. There will be two distance sensors pointing upwards that will let you control certain aspects of the sound playing. All the while giving the user a simple DJ type interface that anyone can use and still make decent music. 

Materials:

As for materials will use a simple design of plexiglass top which will be lifted up by 4 wood rods at each corner with a wood bottom with all the electronics will be mounted down.

New Concept:


Week 1:

Concept Drawing:

What it's about

For the final project Philip and I will build a musical sequencing interface that allows
a user to create a looping melody using a visual layout of 4x4 physical pads that can
be individually enabled/disabled and correspond to individual instruments or key
pitch.

To achieve the necessary functionality we will use Arduino to not only interface
with the physical controller, but to also communicate with Max/MSP which will
be responsible for processing, generating and outputting all audio signals via the
computers built-in sound card.

By creating a physical interface for a “software” audio sequencer with dedicated
buttons corresponding to specific instruments and sounds, we allow the user to
simply enjoy the process of audio composition without the distraction of a screen/
mouse/keyboard and allow them to directly manipulate the media itself.

In the future the functional possibilities of this physical interface can be greatly
expanded by using a 3rd party Arduino library to allow the device to interface as
a fully programmable MIDI controller with many commercial audio production

software.

Friday 12 October 2012

Design Exercise 3: Sense


Week 3:

Schematic:

Arduino Code:


int lightCutoff = 600;

//Photocells
int sensor0Pin = A0;    
int sensor0Value = 0;
int sensor1Pin = A1;    
int sensor1Value = 0;
int sensor2Pin = A2;    
int sensor2Value = 0;
int sensor3Pin = A3;    
int sensor3Value = 0;
int sensor4Pin = A4;    
int sensor4Value = 0;

//Player 1 score
int p1s1 = 11;
int p1s2 = 10;
int p1s3 = 9;
int p1s4 = 8;
int p1s5 = 7;

//Reset Buttom
int resetPin = 13;
int resetState = 0;

//Game Over Sensor
int gameoverPin = A5;
int gameoverValue = 0;
int THRESHOLD = 100;

//Buzzer
int buzzPin = 2;
#define NOTE_C6  1047
#define NOTE_D6  1175
#define NOTE_E6  1319
#define NOTE_F6  1397

void setup() {
  Serial.begin(9600);

  pinMode(p1s1, OUTPUT);
  pinMode(p1s2, OUTPUT);
  pinMode(p1s3, OUTPUT);
  pinMode(p1s4, OUTPUT);
  pinMode(p1s5, OUTPUT);
  
  pinMode(buzzPin, OUTPUT);

  digitalWrite(p1s1, LOW);
  digitalWrite(p1s2, LOW);
  digitalWrite(p1s3, LOW);
  digitalWrite(p1s4, LOW);
  digitalWrite(p1s5, LOW);

  pinMode(resetPin, INPUT); 
}

void loop() {

  //Reset Score Bottom
  resetState = digitalRead(resetPin);

  if (resetState == HIGH) {     
    digitalWrite(p1s1, LOW);
    digitalWrite(p1s2, LOW);
    digitalWrite(p1s3, LOW);
    digitalWrite(p1s4, LOW);
    digitalWrite(p1s5, LOW);
  }   

  //Game over sensor

  gameoverValue = analogRead(gameoverPin);

  if (gameoverValue >= THRESHOLD) {
      
  tone(buzzPin, NOTE_F6, 500);
  delay(100);
  tone(buzzPin, NOTE_D6, 500);
  delay(100);
  tone(buzzPin, NOTE_C6, 1000); 
    digitalWrite(p1s1, HIGH);
    digitalWrite(p1s2, HIGH);
    digitalWrite(p1s3, HIGH);
    digitalWrite(p1s4, HIGH);
    digitalWrite(p1s5, HIGH);
    delay(200);
    digitalWrite(p1s1, LOW);
    digitalWrite(p1s2, LOW);
    digitalWrite(p1s3, LOW);
    digitalWrite(p1s4, LOW);
    digitalWrite(p1s5, LOW);
    delay(200);
    digitalWrite(p1s1, HIGH);
    digitalWrite(p1s2, HIGH);
    digitalWrite(p1s3, HIGH);
    digitalWrite(p1s4, HIGH);
    digitalWrite(p1s5, HIGH);
    delay(200);
    digitalWrite(p1s1, LOW);
    digitalWrite(p1s2, LOW);
    digitalWrite(p1s3, LOW);
    digitalWrite(p1s4, LOW);
    digitalWrite(p1s5, LOW);
  }

  //Start of Counter & Photocells
  sensor0Value = analogRead(sensor0Pin);
  sensor1Value = analogRead(sensor1Pin);
  sensor2Value = analogRead(sensor2Pin);
  sensor3Value = analogRead(sensor3Pin);
  sensor4Value = analogRead(sensor4Pin);  

  //Serial.println(sensor0Value);
  //Serial.println(sensor1Value);
  //Serial.println(sensor2Value);
  //Serial.println(sensor3Value);
  //Serial.println(sensor4Value);

  if(sensor0Value <= 800)
  {
    digitalWrite(p1s1, HIGH);
    //Serial.print("One");
  }
  else if(sensor1Value <= lightCutoff)
  {
    digitalWrite(p1s2, HIGH);
    //Serial.print("Two");
  }
  else if(sensor2Value <= lightCutoff)
  {
    digitalWrite(p1s3, HIGH);
    //Serial.print("Three");
  }
  else if(sensor3Value <= lightCutoff)
  {
    digitalWrite(p1s4, HIGH);
    //Serial.print("Four");
  }
  else if(sensor4Value <= 750)
  {
    digitalWrite(p1s5, HIGH);
    //Serial.print("Five");
  }
  else
    Serial.print("end");


  //End of Counter & Photocells

}


Week 2:


Concept Image:


Main Idea/ Functions:

The whole game works like a pinball machine. You have a launcher that shots the marble up the ramp, while the marble goes up LEDs will light up as you go higher, also there will be a digital score board at the top which will keep track of the highest score so far. If the player hits the top two red LEDs will turn on, to signal  your lose.

Goal of the Game:

The goal of the game is to get as close as possible to the top of the ramp without hitting the top. Hitting the top will count as a lose.

Rules to the Game:

1- Each player has 3 tries.
2- Hitting the top will count as a lose.
3- The launcher is the only tool you can use to launch the marble.
4- Have fun.


Week 1:


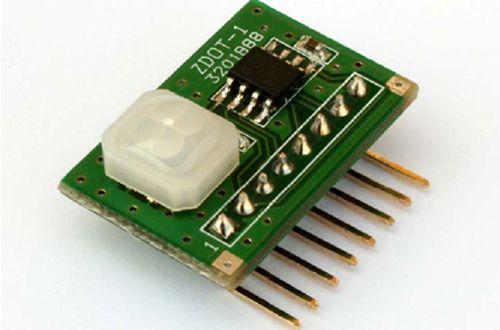
Sensor Name: ZDots

Manufacturer & Part Number: Zilog SBC 3201888

Researcher Names: Unknown

Image of Sensor:


Describe the main function of the sensor:
  •  Complete, fully functional motion detection SBC including Fresnel lens
  •  Comes pre-programmed with motion detection software
  •  Sensitivity control via simple hardware configuration
  • Advanced serial (UART) based configuration and interface
  • SLEEP mode for low power applications     
  • No temperature compensation required
  • Input to support CDS photocell input for ambient light detection
  • Minimal components ensure highest possible Mean Time Between Failures (MTBF)
  • Application code can also be modified to support custom solutions
  • Complete development system available

Example of applications in the real world: 
  •  The sensor can be used to make a machine follow a specific colored line. Making the machine act like it’s on a track, like a train.
  • Can use the sensor as motion detector. (Example: Security System)

Electrical Characteristics of the sensor:
  • Small form factor—25.5 mm x 16.7 mm
  • Wide 5 m x 5 m, 60 degree detection pattern Operates from 2.7 V to 3.6 V power supply
  • Simple 8-pin interface
  • Standard operating temperature: 0 °C to 70 °C

Schematic Diagram of Sensor & Arduino Wiring:
Wiring and Pin diagrams


Additional parts needed for proper operation

N/A

Provide a code sample for reading the sensor:


//Motion Detector

 #define DEV_ADDR    1 
 #define DATA_IN_EP   1 
 #define DATA_OUT_EP   2 
 #define INTERRUPT_EP  3 
 #define CONFIG_NUM   1 
 #define SLEEP_MODE_PIN 4 
 #define MOTION_DETECT_PIN 2 
 int val; 
 void setup()  
 { 
  Serial.begin( 115200 ); 
  Serial.println("Start"); 

  delay( 200 ); 
  //PIR related 
  digitalWrite(SLEEP_MODE_PIN, HIGH); 
 } 
 void loop()  
 { 
  val = digitalRead(MOTION_DETECT_PIN); 
  //the ePIR sensor is active low so if motion is detected the output is low 
  if(val == LOW)
    Serial.println("DETECTED"); 
  else
  Serial.println("NON DETECTED");
 }  

References / Bibliography:
Conceptual Application:

We can integrate the sensor into a laser mouse. Giving the mouse accurate movement, also mouse pads can be fabricated with a certain colored pattern on it, making it possible to create a straight line, circles and other shapes with ease. This would give the mouse a secondary component to it, which be used as a drawing tool, and also as a tracker.

Tuesday 25 September 2012

Design Exercise 2: Animate


Week 3:


- Storyboard:

The story is this otherwise inanimate object coming to life. Having human like abilities to move around in the work such as walking and sight. New the the world this little being finds itself walking away from anything in front of him.

- Schematic:


- Arduino Code:

#include <Servo.h>


Servo myservo1;
Servo myservo2;
int sensorPin = 0;
void setup()
{
Serial.begin(9600);
myservo1.attach(5);
myservo2.attach(6);
}

void loop()
{
int val =analogRead(sensorPin);
Serial.prin0tln(val);
if (val > 250)
{
//delay(3000);
myservo1.write(110); // rotate very slowly counterclockwise
myservo2.write(80); // rotate very slowly clockwise
}else
{
//delay(3000);
myservo1.write(80);
myservo2.write(110);
}
}

- Tech Demo:

 http://www.youtube.com/watch?v=NSs2atvn4mA&feature=plcp


Week 2:


- Complete a functional prototype:

The structure of my project is done and everything is glued and screwed together, also the arduino works, how I want it to work. I did find some problems when working on making the prototype work. I had a hard time getting the servo motors, to turn at the same speed. It seems the continuous rotation servo motors move a little faster, when moving clockwise. My counter-clockwise motor seem to always lack behind, making my whole object turn a little each time it moves. Also since I built my structure before getting my motors, I didn't take into account how much space the servo motors would take up. Nonetheless I did what I can to fix these problems and still came out with a object that works as I imagined it to.

Week 1:


- Concept and Intentions:

So my idea is to make this triangle that will slowly transform itself into something different and then come back to it's original form, yet it will stay in place when it animates. Not sure how far my prototyping will get me, but I'm hoping to make it into a closed off object with a simple switch to turn it on.

How it will work:

So the left and right side of the triangle will be rotation in opposite directions (the right side will turn clockwise and the left one will turn counter clockwise) both will move at the same speed, and as they rotate the corners of the triangles will lift the object up into the air and then slowly bring it down, back to it's original form. Also the square bottom of the object will also turn clockwise while both sides are moving.

- Works that Relate:

Newton's Cradle:


Neocube:


- Storyboard of Object:

The story is, bringing something to life that we usually see or think of in a solid non-moving form, which will be the triangle, we interpret the triangle as geometrical object that is used in math/physics/etc. We never see the triangle as something more then it really is. So the goal here is to make it into something more by bring it to life and animating it.

- Technical Diagram:


Friday 7 September 2012

Design Exercise 1: Make a Switch

Week 2:


- Short Description of Concept:

So the concept is to use the Nintendo controller board as a layout of many switches. The penny is used to complete the circuit. You can touch pretty much any metal area on the controller and make the LED turn on, basically making the switch itself an interactive experience.
- Storyboard for your interaction:

The story behind is, every manufactured product requires money and time to produce. Therefore money is an essential part of the creation and function of the product. Example: Nintendo requires money from the clients in order to create new and improved Nintendo systems.

- Schematic Diagram of Final Circuit:


Week 1:

I found it hard to find things around my house that could conduct electricity. I realized that most materials that  are created by manufacturers are non conductive. I found 3 items that i will be using for my switch project:

1- Broken open Nintendo controller with a Penny


2- Some Conductive Fabric


3- Aluminium Paper